Sublimation with Artesprix Markers
Nov 24, 2020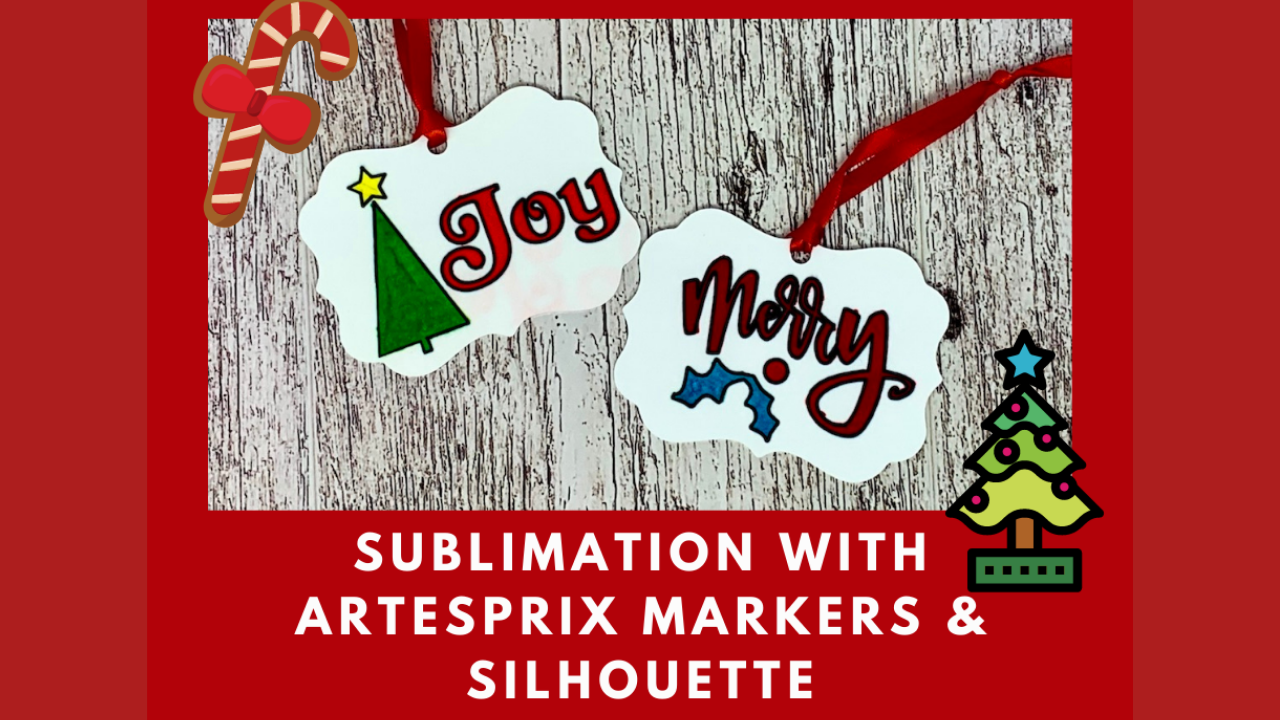
You may or may not have heard the word “Sublimation” in the crafting circles — and wondered what in the world it is! So, in simple terms, it’s a method of printing that transfers a design into a material or fabric using ink and heat. Sublimation printing uses heat to transfer the ink permanently to whatever material you are decorating. It is actually a chemical process that turns the gel ink into a gas form that is absorbed or embedded into your “substrate” (which can be fabric, metal, acrylic – a wide variety of materials.) The result is a permanent, full color image that won’t crack, peel or fade away.
Traditionally, this process requires special ink, paper & a dedicated printer. However, the clever folks at Artesprix have developed special Sublimation Markers that allow you to sublimate without all of that. It can be done as simply as tracing or coloring an image on regular copy paper and pressing with a home iron or heat press! But today, I want to share with you how you can use your Silhouette to create these festive Christmas ornaments!
You will need:
Artesprix Iron On Markers
Plain Copy Paper
Protective Paper – not a Teflon sheet
Heat Tape
Sublimation Blanks – in this case, a Christmas Ornament
Silhouette Pen Holder – Type A
This Pen Holder fits the following machines
- Silhouette Portrait®
- Silhouette Portrait® 2
- Silhouette Cameo® (original)
- Silhouette Cameo® 2
- Silhouette Cameo® 3
- Silhouette Curio
Silhouette Pen Holder – Type B
This Pen Holder fits the following machines:
In Silhouette Studio
I used a template for the ornament that I downloaded from Unisub. Unisub is the manufacturers – but only sells through distributors – which Artesprix is one! Open that template in Silhouette Studio. This template is the exact size of the ornament and gives you the boundaries where you can draw or create.
After downloading, open the jpeg version of the template. Open the Trace Panel –>Select Trace Area. Drag your mouse around the template area until it is all yellow. –> Click Trace.

Delete the original template & you will be left with a cut outline of the ornament. However, you do not want this to cut – it’s just a guide for your design – -so open the Send Panel & with the design selected, select No Cut. Now you will be ready to design your ornament in Studio.

 I duplicated the ornament template to create more than one design. Bring in your selected designs to the templates. The first one I used was Design #272555 from the Silhouette Design Store. The extra parts of the holly leaves are meant to be layered, so I just ungrouped & deleted them.
The other one is Happy Joy Christmas Set – Design #33801 from the design store. Again, ungrouped and edited to fit the ornament. (I have thickened the lines in the picture below, to make it easier for you to see.)
I have also duplicated these designs so that I could sublimate both back & front. (I just rotated one 90 degrees to fit all 4 on the paper.) I also added a small circle at the bottom right side of the page. This allows any excess ink to pool outside of your design when finished sketching.
REMEMBER TO MIRROR IMAGE YOUR DESIGNS! Sublimation designs are pressed face down – so they need to be Mirrored to print correctly.

Insert the Sublimation Marker into the appropriate Pen Holder, depending on which machine you are using. Remember, there are 2 different Pen Holders from Silhouette –
Silhouette Pen Holder – Type A
Silhouette Portrait®, Silhouette Portrait 2, Silhouette Cameo® (original), Silhouette Cameo 2 and 3, Silhouette Curio
Silhouette Pen Holder – Type B
Silhouette Cameo 4, Cameo Plus, Cameo Pro, and the Silhouette Portrait 3
Since I am using the Portrait 3, I am using the Pen Holder Type B – the grey adapter fits the Artesprix markers. This is the Black Fine Tip marker from Artesprix.
This video from Silhouette shows how to use the Pen Holders. (The video shows the Type A Pen Holder, but the technique is the same.
Place the Marker in your machine & lock down. Place regular copy paper on your mat & load to the machine. Select the sketch action in the sent panel – -and go! Your Silhouette machine will sketch the designs – but not the outline of the ornament, as we turned those cut lines off.


Once the designs are complete, remove the paper from the mat & use your choice of colors markers to use! Just like preschool! I always place another sheet or two of paper underneath while coloring. This protects my worktable from any ink bleed through.

Now, before you ask, I got this cool Marker/Pen holder on Amazon! Click here for the link!
Once your design is colored, secure it to the ornament blank (face side down) with Heat Tape.

Now, layer the ornament between 2 layers of Protective Paper creating a “sublimation sandwich”. This protects your heat press from any ink bleed. Now, with the design on the top side, press with a medium pressure — 400-degree temp, for 75 seconds.

Once the ornament is pressed, it will be hot!! Be careful & use gloves, or wait till it cools. Remove the protective paper, heat tape & colored design. Your ornament is done! If you want to press both sides, wait until the ornament completely cools before pressing the 2nd side. 
There is just so much you can do with Artespricx markers & your Silhouette Cameo!
Until Next Time--
 FYI – This post may contain affiliate advertising. This means that if you click a link in the post, I may make a commission based on your purchase. The price you pay for the product or service is not higher, and the commissions I earn allow me to keep sharing tutorials & info with you!
Stay connected with news and updates!
Join our mailing list to receive the latest news and updates from our team.
Don't worry, your information will not be shared.
We hate SPAM. We will never sell your information, for any reason.
Meet The Author

