Etch Slate with Your Silhouette Machine
May 12, 2023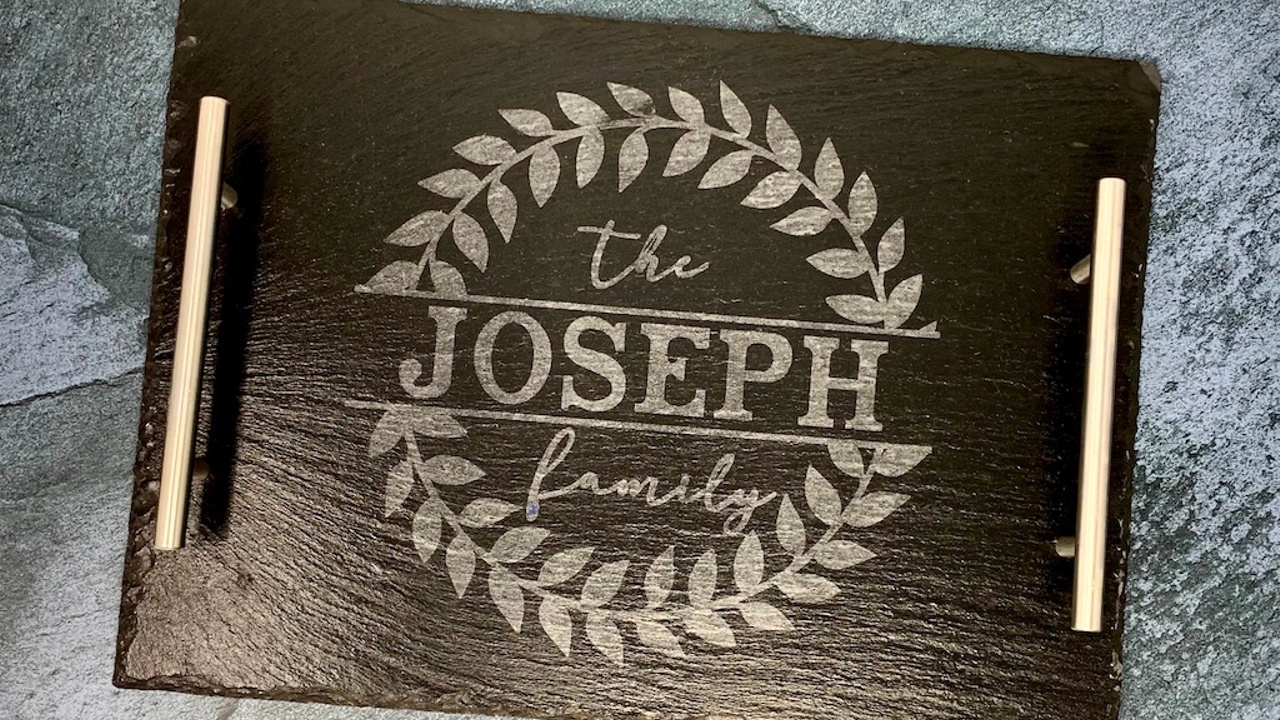
I have been using my Cameo to create stencils for Glass Etching for years! I love it & feel like it gives such impressive results with a minimal amount of effort. However, I had never etched on slate until recently. I realized that EtchAll Etching cream can create a beautiful etch on slate, in addition to glass. (Etchall is my favorite Etching cream - and I've tried them all.) So I decided to give it a try! I have been thrilled with the results & wanted to share it with you here!
Materials you will need:
- Slate surface to etch. I found these on Amazon - and there are a lot of different slates to choose from - 8" x 12" Rectangle Cheese Board, Large Slate Board with Handles, Hanging Signs, Coasters and more! Lots of options! But, be sure that what you purchase is actually slate - read the descriptions. I bought a chalkboard sign that said "Our chalkboards are made of the highest quality Magnetic Porcelain Steel and are 100% non-porous. " - Should have read closer. It did not etch & there is really no way of knowing it without trying.
- Oracal 651 Adhesive Vinyl for stencil
- Transfer tape
- Sque-gee for applying vinyl & transfer tape. I really like this one because it has the felt edge & won't lift up the cut edges of the stencil.
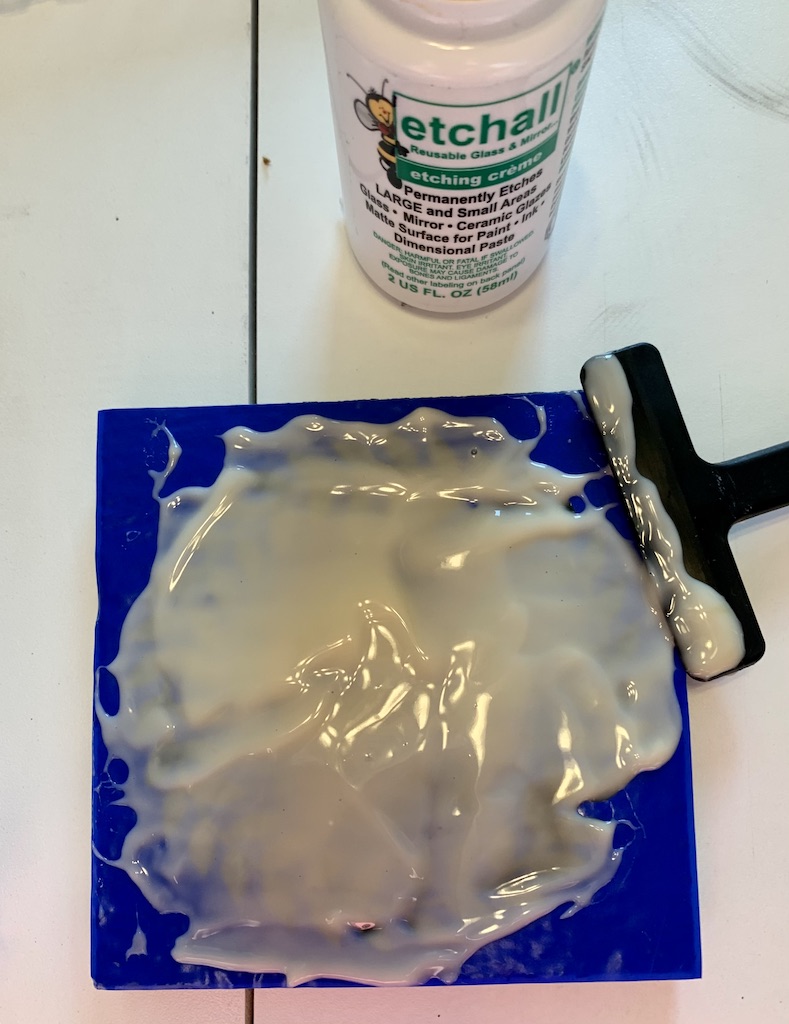
- Etchall Etching Cream (Currently 20% off with this link & code MERRY thru 12/24/20) Also available on Amazon
- Small spatula for applying cream
- Chalk or Chalk Markers for writing on the slate. I found these chalk markers to work much better than chalk. This can be erased with a wet cloth.
Select a design that is bold & fairly thick. Don't use one with too many tiny details or fine text. The slate is an uneven surface, and so you are at greater risk of the etching cream seeping under the vinyl. Small details can get lost. I used this beautiful Family Monogram Wreath. 
I then placed a box around the design that is the full size of the slate item I am using. This creates the best barrier for the entire slate surface. If your cut box is the exact size of your slate item, then it makes it much easier to use the edges of the box to apply your vinyl straight.

Cut your Stencil from Oracal 651 Vinyl – not stencil material. Again, you need the stencil that will stick the best, and stencil material tends to be less sticky than permanent adhesive vinyl. I always cut my stencil to cover the entire surface – for example in the cheeseboard above – it was 8″ x 12″. This covers the slate & prevents any accidental etching from occurring. Weed out the design – or area you want to etch.

Place your Stencil on the slate - After weeding your design, use transfer tape to take it from the paper backing to the slate board. Be sure it is very secure to the slate. Slate is an uneven surface and may be a little tricky to get the vinyl to adhere to. After burnishing with the squeegee over the transfer tape, I remove the transfer tape. I then go over all cut edges with my finger, just to be sure the vinyl is secure. The uneven surface of the slate makes it a little harder to apply the vinyl, than it would be on a smooth surface. This is very important to be sure the cream does not seep under the vinyl. This stencil is not reusable! You can probably use the transfer tape 2-3 times, but probably not much more. There is a slate "dust" or "crumbs" that sticks to the transfer tape & makes it not sticky.
Place a thick coat of the Etchall Etching Cream. Use the mini squeegee to spread a nice, even coat over the entire weeded area. Don't worry about wasting the cream, as once it has etched - you can scrap it off & back into the jar -- and reuse it! This can be done multiple times. Don't worry if your cream has turned from a creamy white to a brown or been black color. This does not impact the etching capabilities of Etchall. Let the cream sit on the slate/design for 20 minutes or so, undisturbed. Then, scrape all excess cream back into the jar. Be careful that the cream does not touch any areas that you do not want to be etched. This is a permanent process -- there is no removing it once it has etched. This cream literally eats away the surface of what it is etching.
Go to the bathroom or kitchen sink & rinse any cream residue off. Be sure it is thoroughly rinsed before removing the vinyl stencil. Once the cream is removed, you can remove the stencil. Dry & you are done! You may not see the etching results while it is wet. Dry the item with a towel & then let it finish air-drying. As it dries, you will see the etch effect appear. You may also notice some irregularities in the slate that cause a little inconsistency in the etching - but that is just the nature of using a natural product. It adds to the uniqueness of your project. You will also notice that different slates have different finishes. The cheese board with handles has a shiny finish - while the coasters are more of a matte finish.
 Hope you enjoy etching slate -- There are so many wonderful & impressive projects that can be created with this process! Enjoy!

FYI – This post may contain affiliate advertising. This means that if you click a link in the post, I may make a commission based on your purchase. The price you pay for the product or service is not higher, and the commissions I earn allow me to keep sharing tutorials & info with you!
Stay connected with news and updates!
Join our mailing list to receive the latest news and updates from our team.
Don't worry, your information will not be shared.
We hate SPAM. We will never sell your information, for any reason.
Meet The Author

