Cutting Felt on the Cameo 4
Mar 06, 2020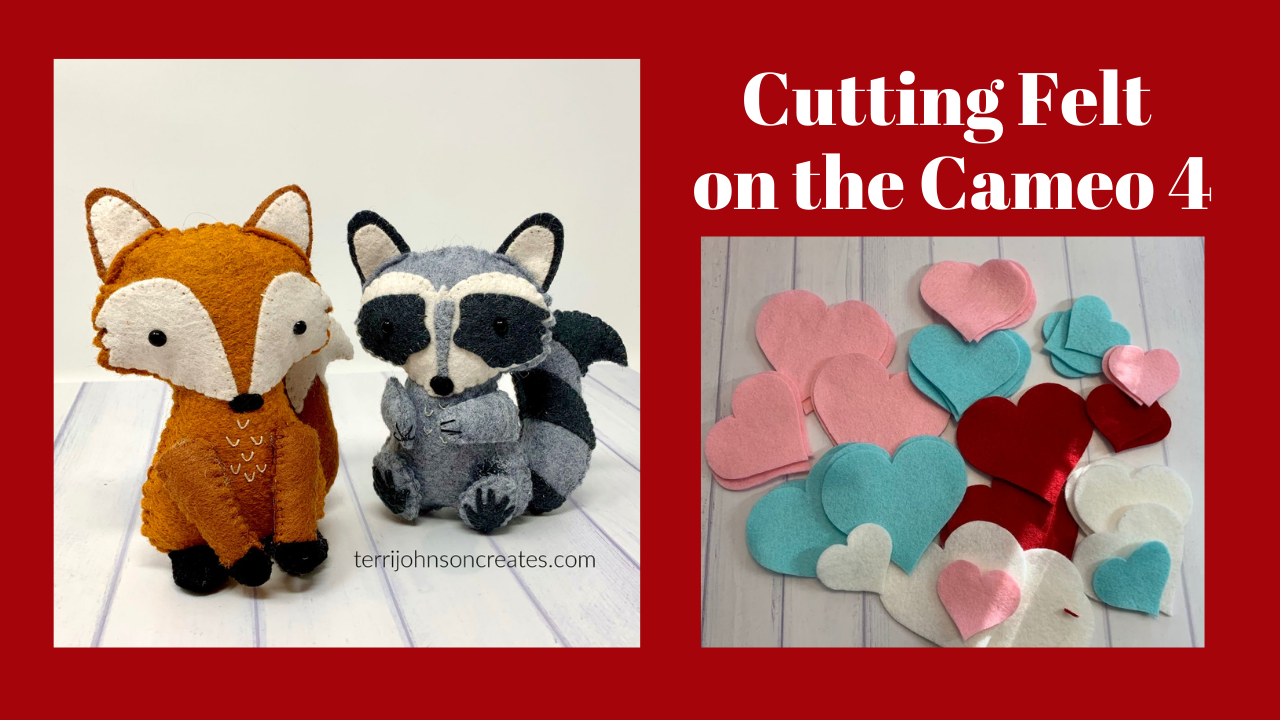
Use a Strong Tack Mat — This mat has a higher tack finish to it, and gives a nice, strong grip to your felt. I also use a brayer to secure the felt down to the mat. You may think that it is secure just using your hands, but a brayer smooths out any wrinkles, as well as giving you the best stick possible.

Note: Cutting felt (or any fabric) with the Cameo & Rotary blade, will leave a lot of fiber & residue on your mat. I would suggest that you keep a mat designated for felt & fabric, only. Before the mat gets too far gone, I would wash it with just warm soap & water – to remove some of the fibers.
Choosing Your Design:
Not all designs are going to work well with the rotary blade. Intricate turns & curves will be difficult for the rotary blade to navigate. The rotary blade has to stop, lift & change directions as it cuts the designs in the felt. Larger, simple designs work the best – for example, these hearts cut easily & without any issues at all! These hearts are from the Silhouette Design Store — Lori Whitlock’s 11 Hearts – Design #37852


This Rolled Flower by Lori Whitlock, from the Silhouette Design Store – Design #302218, is also a great flower to be cut out of felt with the Rotary Blade.


However, I was also able to cut the small pieces for some adorable little Felt animals! (Full disclosure – I did cut the little “paws” on the raccoon’s feet by hand. Those tiny little fingers were so small, that they would have just fallen apart if cut by the blade.) These little animals are from Lia Griffith! She has a wide variety of Felt designs on her site! In order to access the SVG files & full tutorials, you need to be sign up for her Member Make program! Once you are a member, you have INSTANT ACCESS to hundreds of easy-to-use project templates (PDF and SVG!), plus step-by-step tutorials so you can craft with confidence. And you can participate in the Live Member Make each month!


Sometimes, you will have a few connecting threads, or a tiny little “miss-cut” – and when that happens, I simply cut those with my small little micro scissors.

Cutting the Design —
Once you have selected the design you want to cut and adhered the felt to the mat — its time to cut! Turn on the machine & insert the Rotary Blade into Tool Holder 2. (this is important — so the software can recognize the Rotary Blade.) Be sure that you you twist the protective “collar” on the blade housing all the way down, so that the rotary blade is completely exposed.

Be sure the blade is completely seated & locked into the tool holder. If not, the blade will not cut correctly. Also, the software will not detect that you have the rotary blade inserted & you won’t be able to select Rotary Cut in the Send Panel. (Notice that my blade is covered with felt lint – from all the felt that I’ve been cutting! LOL!)

In the Software:
Select your design on the Design Page, Click the SEND tab to open the cut settings.

The default setting will open Tool 1, but since we are using Tool 2, you want to set Tool 1 to “No Cut”. This will turn off the bright red lines. If you do not turn off Tool 1 (set to No Cut), then the machine will perform that action first! You do not want that!
Open the drop down menu for Tool 2, Choose “Felt, Acrylic” as your materials. (I realize that this is not acrylic felt, but I have found that the default settings in the software cut the wool blend felt great!) You may need to test your cut settings, depending on the type & thickness of the felt you are cutting.
Select Rotary Cut for the action. You will see the cut lines turn blue (this indicates Tool 2) and “hooks & loops” appear on the Cut Page. The “Hooks and Loops” are part of the Silhouette Smart Cut Technology. These “hooks & loops” allow the blade to change direction, and reset to cut the design properly. When arranging your designs on the design page, it is important that these “hooks and loops” do not fall inside of the design pieces, or intersect any cut lines. I find that its best if pieces of the design are not placed too close together. Now you ready to cut.


That’s it!! That is just how easy it is to cut felt with your Cameo 4 & the Rotary Blade! (When its finished, this design will be a Pineapple Feltie from Lia Griffith! It’s for my granddaughters’ “Tutti Fruiti” Two Year Old Birthday party!)
I have really enjoy working with these felts & stitching some simple hand embroidery! Most of these projects use only 2-3 simple stitches. There are some great, easy tutorials on how to create these Stitches — Blanket Stitch, Whip Stitch and Fly Stitch.
These are all simple stitches that can be easily accomplished to put together these little projects — even by beginners!

These are just a few of the beautiful wool felts that I ordered from Lia Griffith this week! I love all the colors & the feel of these!


Stay connected with news and updates!
Join our mailing list to receive the latest news and updates from our team.
Don't worry, your information will not be shared.
We hate SPAM. We will never sell your information, for any reason.
Meet The Author

