Custom Gift Wrap with Silhouette
Nov 29, 2020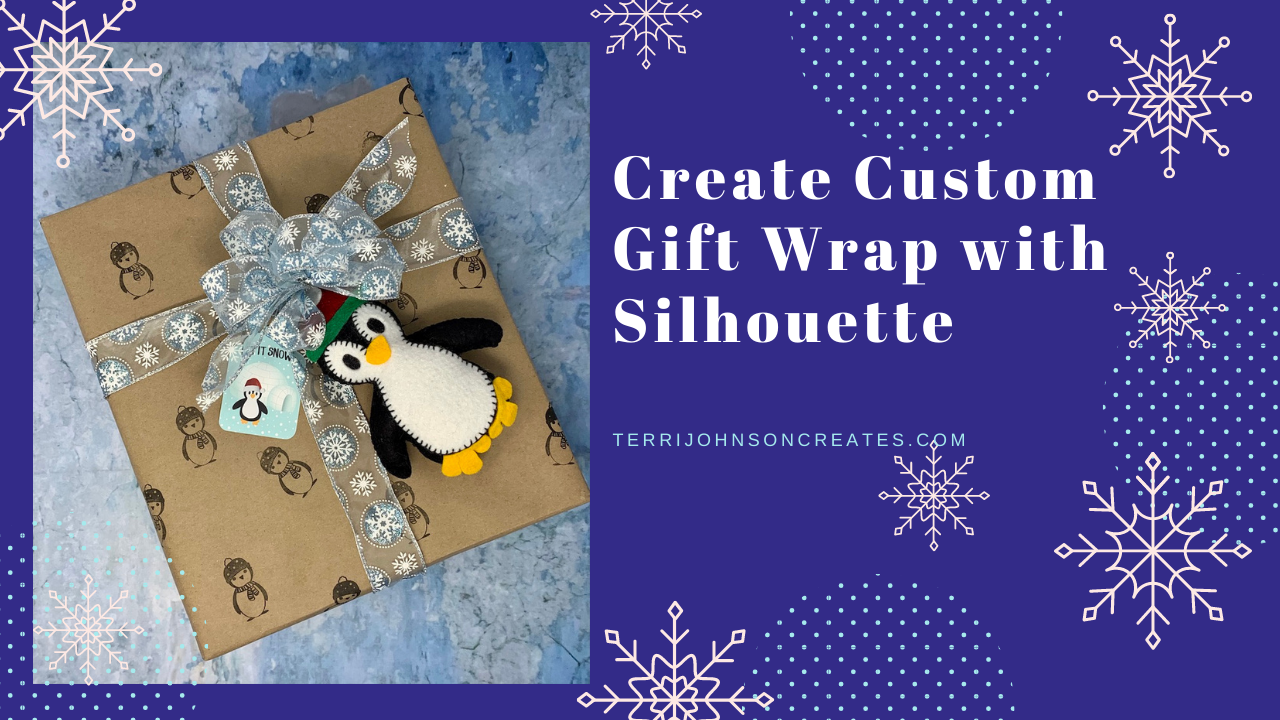
With Thanksgiving in the books, it’s time for a “full-court press” to Christmas! When Silhouette America asked me to share some Christmas Gift wrap ideas, as usual, my thoughts went to how I could incorporate cutting felt on my Cameo 4 for this project. I used the Silhouette Cameo Pro for these projects, but they can all be adapted to be used on any Silhouette Cameo 4, Cameo Plus, or the Pro. I am using the Rotary Blade for these to cut the felt. (I have not had much luck with cutting felt on the previous models without the rotary blade).
So after some thought, and lots of testing — I decided to do a 2 part project. So I created a felt ornament to decorate the package, that can then be removed & hung on the tree! I hate that all of the beautiful gift wrap is just thrown away, so this is a way to save some of it. And the 2nd part is using my Silhouette Mint to decorate the wrapping paper with a coordinating design!
Felt Ornament:
Materials Needed:
- Cameo 4, Cameo Plus, or Cameo Pro
- Rotary Blade
- Penguin Design #237295 from the Silhouette Design Store. Reindeer – Design #308850
- Felt – (I used beautiful Wool blend felt from Lia Griffith. Other felts can also be used, but you should test cut your settings before embarking on your project!)
- Embroidery Floss
- Fabric Fusion Glue or Hot Glue Gun
- Small amount of stuffing or polyester fiber fill
Did you know that you can use designs from the Silhouette Design Store to cut much more than paper or vinyl? You can! And so, I selected a design from the store that had simple, basic shapes. I did want to be hand stitching tiny little, complicated shapes. Plus, the rotary blade cuts best when there are not a lot of points & complicated angles — as it has to lift & pivot for each curve.
Next, before ungrouping anything – I sized the design to the approximate size I wanted the ornament to be. This keeps all the pieces in proportion. Then, to get the best cuts possible, I had to do a little editing. For example – with the Penguin design, I decided to not cut the mittens and deleted them. Also, I deleted the tiny white circles from the center of his eyes, and the 2nd layer of his beak. To do this, simply ungroup & delete them. And instead of a “jagged” pom-pom on his head, I replaced it with a basic circle, using the drawing tools. Then I placed the remaining pieces around the mat, so I could put different colors in each corner.

or the Reindeer, after ungrouping & removing the different color sections, there were holes in the reindeer’s face. Since I wanted a solid piece, I had to “Release the Compound Path” and then select & delete all of the inner “hole” pieces. I then had a solid reindeer face. I did the same thing with the little white circle on his nose. After editing, I placed the pieces around the mat to cut. Be careful not to place the felt or designs too close to the edge of the mat, or to one another. The rotary blade needs room for the “loops & hooks” – when it lifts & pivots.

Because we are stuffing the little ornaments, we need to cut 2 of some pieces. For the Reindeer, it is the head & Antlers – so I duplicated those pieces. And because they are just too tiny to cut, I decided to embroider the face with floss, and you could use beads for the eyes.

For the Penguin, I duplicated the feet, the body, and hat.

Now it’s time to go to the Send Panel. Be sure all of the pieces of the design are selected. In the Send panel, select “No Cut” for Tool #1, then, in Tool #2, select “Felt, Acrylic” for the material (even though its wool blend felt, I found this setting works well). Next, Select Rotary Cut for the Action in Tool #2. If your machine is turned on & selected, the software will automatically select the Rotary blade for this action. You will notice that the cut lines turn blue when using the rotary blade in Tool #2. The extra lines are the “loops & hooks” of the rotary blade Smart Cut technology. This is why you need to leave room around your pieces. When your screen looks like this, you are ready to send to your machine & cut!

Place your felt pieces on the mat in the places to correspond to the placement on your workspace screen. I always use a brayer to secure my fabric to the mat, because its very important that your fabric not move or lift during cutting.

With the pieces all cut, it’s time to assemble. For the penguin, I stitched the white piece to the black body first – then stitched the back to the front, leaving it open at the top of the head. Lightly fill with stuffing, and stitch closed. I also stitched the hat together, leaving the bottom open. Inserted a small amount of stuffing & then stitched down to the head. I then glued the pom-pom, feet & scarf. For the reindeer, glue the small pieces of the nose, inside of the ears, to the face. Add the details for the eyes & mouth now, using either embroidery stitches or beads/buttons. Stitch the 2 pieces of the antlers together, leaving an opening at the bottom. Stuff with a small amount of stuffing, using a dowel rod or pencil to stuff it. Insert the antlers, secure them & finish up the blanket stitching. Insert floss or ribbon for a hanger at the top. If you need help with your embroidery stitches, this is a nice tutorial.
Your little critter is now complete & it’s time to move on to the Mint

Wrapping Paper portion of your project!
Mint Stamps – To create the Mint stamps for the wrapping paper, I used the Silhouette Mint. The Mint uses a different software – Mint Studio & is very similar looking to Silhouette Studio. Silhouette has a very complete & wonderful YouTube class on using the Mint & Mint Studio. Rather than re-invent the entire wheel on the Mint, I recommend you watch this class, to learn how to use your Mint!
I used these designs from the Silhouette Design store to create my stamps for my wrapping paper – Winter Penguin – Design #22746; Merry Christmas Santa Town – Design #282579. to coordinate with my little felt critters. Once my stamps were created & all inked up, I began stamping randomly on butcher paper. I have a large roll of butcher paper that I use for my sublimation – and this is perfect for this project. And the price is certainly cheaper than wrapping paper!

Once your stamp is inked up (let it sit for 10-15 minutes – to soak in) – stamp off any excess on trash paper. Then begin stamping your butcher paper. I just randomly spaced the little penguin all over the paper – and when I thought I was done – I went back in & filled in any blank spots! Your mint stamp can stamp a LOT of times before running out of ink. This package is 10.5″ x 12″ and I stamped the entire 28″ x 18″ of butcher paper with just one inking!

FYI – This post may contain affiliate advertising. This means that if you click a link in the post, I may make a commission based on your purchase. The price you pay for the product or service is not higher, and the commissions I earn allow me to keep sharing tutorials & info with you!

Stay connected with news and updates!
Join our mailing list to receive the latest news and updates from our team.
Don't worry, your information will not be shared.
We hate SPAM. We will never sell your information, for any reason.
Meet The Author

