Create Photo Text in Silhouette Studio
May 04, 2023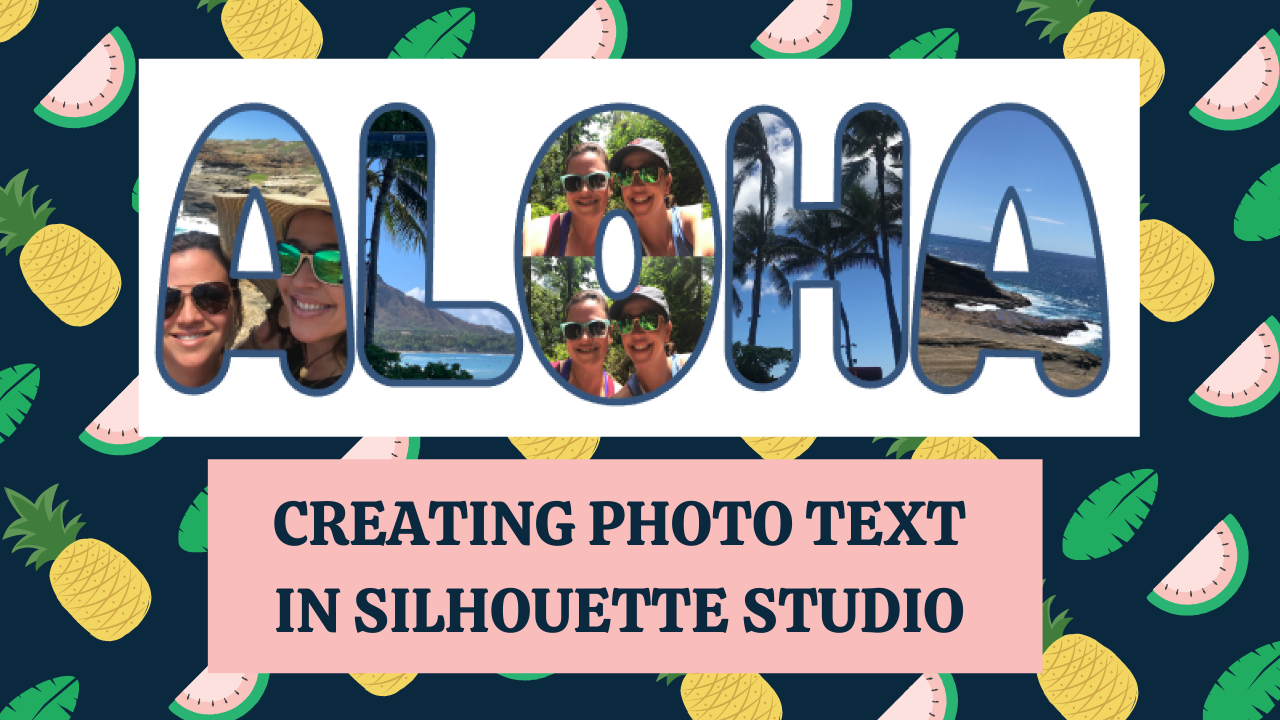
As you may know, I recently attended the Silhouette Summit in Hawaii in May! (This is a re-to post -- the Summit was pre-Covid). My 2 daughters tagged along, and we had a wonderful time. I wanted to make a little keepsake from the trip – so, I thought I would create a Photo Text Collage. With the Designer Edition of the Silhouette software, you can add photographs to the Pattern Folder in your Library – Super Easy!
To do this, simply open your Library – and then find the file where your photos are selected. Simply select those photos & drag them into the Pattern folder in the Silhouette Library. In just a few minutes, they will appear in your pattern folder. Once they are loaded there, you can go to the Design window.

I set my page to 8 1/2 x 11″, because that is what I was going to print on, but you can select the size paper you are going to use.
Open the Text Tool panel and select the font you prefer. It should be a “fat” type of font, with as much space as possible to maximize your pictures. I used “Knick-knack”, which I downloaded from the Silhouette Design Store. With my font selected – I typed the word “ALOHA” In all caps.

First, ungroup your text, so that you can fill each letter with a different photo. Next, select your first letter.
Open the Fill window and select the Pattern icon. Scroll through the list to find the photos that you just loaded. With your letter selected, simply click on the photo you want to use & It will fill your letter. Now, this may or may not look like you want, so we have some options. Go to the bottom of this panel and open the Advanced Options. 
Now, I have filled all of the letters with pictures, so that I can show you how to adjust them with the Advanced Options & get the look you want!

Angle – This allows you to turn & angle your photo in the direction you want, which gives you the ability to place important parts of the photo in specific parts of the letter. There is no right or wrong with this – its just what you want & feel is visually appealing. You can use the slider bar, or percentage & arrows on the right.
Scale – With the letter selected, use the slider to adjust your picture up or down. This way, you can get the best selection of your picture. If you enlarge it, you can also have multiple copies of the same photo in one letter, by scaling the photo down smaller. Then, you will see the photo fill with your picture repeatedly. My example is the “O”, filled with multiples of a picture of the girls.
Pan – When you click on this icon, a little +sign within a circle appears in the middle of your photo. Place your cursor on that icon, and you are then able to pan around the photo to be sure you get the portion of your photo you want, in the right part of the letter! I used this function in the first “A” – -to be sure that I got the most of the girls faces.
When Scaling the pictures, you can use the “Aspect Ratio” to either maintain the exact ratio — or stretch/shrink the pics to fit the letter. You can also mirror horizontally & vertically, but I did not use that feature in my example.
In the process of filling your letters, you may have moved them around. So, select all of your letters & open the align tab in the Quick Access Tool bar. From there, you can align them in the center, and space them horizontally. This spaces each letter an equal distance apart.
This next photo shows the options that I used on each letter.

After adjusting all your photos in the letters, and you have them the way that you want to Select all your letters and Group.
Border:
At this point, I wanted a border around my photos. Since we are printing & not cutting this image, I simply opened the Line Tool panel, and with the letter selected, increased my line thickness to 6.0. (You can do this to the entire word all at once, I just used one letter for the purpose of these photos.)

In this panel, you have some options. to place your line in front of, or behind the pictures. With the Corner option, you can decide whether you want the corners of your text square, flat or round. For this font, I wanted rounded corners –so I selected the first option (highlighted in blue) – but depending on your font, you may want something different.
With the Position Option, you can select whether you want the Thick Outline in front of your photos or behind. I selected the back. And from there, I could select “Line Color” – and color in the border any color that I wanted. I used the Eye dropper tool to color the thick line a blue in the water from the pictures.


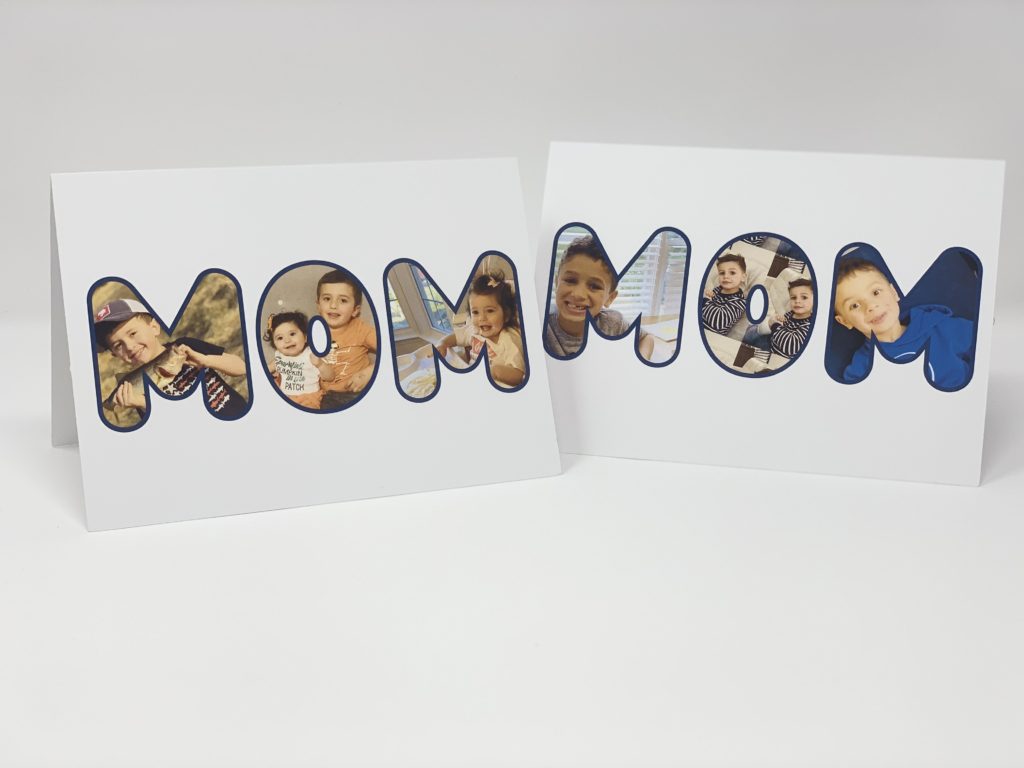
That’s it! Now you are ready to Print your creation & use it in whatever way you see fit! I enlarged my design to maximize the photos and then I rotated it to fit on an 8 1/2 x 11 sheet. I am printing this out for Sublimation – -but there are so many other things that you can do! (If you are interested in learning more about Sublimation, you can check out my All Things Silhouette & Sublimation Facebook page). You could print it on card stock or printable fabric & frame it; Print on to Heat transfer sheets such as this one (my favorite transfer paper) & iron it onto a garment or tote bag. I did this same technique for my girls for Mothers Day cards — so this is perfect for Father’s Day — or any day for grandparents! There are so many options of things you can do with this technique!


Stay connected with news and updates!
Join our mailing list to receive the latest news and updates from our team.
Don't worry, your information will not be shared.
We hate SPAM. We will never sell your information, for any reason.
Meet The Author

